Showing posts with label bread. Show all posts

September 4, 2012

Drew's Onion Dill Bread

 
There were three different handwritten recipes for this bread, and only one of them had the directions. It made me wonder if this bread was made so much that only the ingredients needed to be listed. I'm not sure, but after tasting this bread, I wouldn't be surprised if it was made all the time.

The name of the recipe was also a curiosity. Who is Drew? Why does he have his name associated with an onion dill bread? A quick Internet search for 'Drew's onion dill bread' yielded results for 'Drew's Famous Onion Dill Bread'. Maybe this recipe was written before the bread became famous.

As for who Drew is, one of the recipes I found listed the author of the recipe as Drew Alan Kaplan. Drew Alan Kaplan was the owner of DAK Industries. DAK Industries was founded in 1966 and became a mail-order electronics firm in the 1980's. DAK Industries brought a number of electronic gadgets to the attentionof the US market, including an early ... (wait for it) ... bread machine!  My best guess is that this was one of the recipes that was recommended for use in the bread machine.

I don't have a bread machine, and the recipe instructions don't allude to using a bread machine for baking. Perhaps that is why there are two recipe cards without instructions. It was a fun little investigation, though, and I am glad I have some of my questions answered.

As for making the bread, the one ingredient that interested me the most was cottage cheese. I have not used cottage cheese in baking, let alone in bread, but it was not noticeable at all in the finished product. There were no little white curds sprinkled throughout the interior, which was a good thing.

The bread was a bit time consuming to make with the sauteed onions, but it was well worth it.  The bread was incredibly light and soft.  The onion and the dill seed added a nice spice to counter the delicate sweetness of the honey.  The bread was delicious warm from the oven, and I also liked it lightly toasted with a little butter.  It definitely earned the moniker of 'famous'.


Drew's Onion Dill Bread

In large bowl
1/2 cup warm water
2 packages (2 1/2 tablespoons) yeast
4/12 cup flour
In medium bowl
2 eggs, beaten
1 cup cottage cheese
1 cup sour cream
4 tablespoons honey
4 tablespoons minced onion, sauteed and cooled
2 tablespoons melted butter
2 tablespoons dill seed
1/2 teaspoon baking soda
1/2 teaspoon salt
Dash of onion salt (optional)
Start yeast action with a little honey.  Add contents of medium bowl to water and yeast before adding flour.  Knead 5 minutes.  Let rise 30 minutes in covered bowl.  Punch down.  Put on lightly floured board.  Divide in half.  Roll out on lightly floured board and shape into 2 loaves.  Put in pans, cover and let rise (about 30 minutes).  Brush tops with melted butter. 
Bake 20 minutes at 350 degrees and 5 more minutes at 325 degrees.  Turn out on wire rack and cool.

June 27, 2012

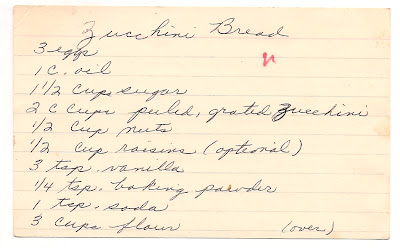
Zucchini Bread


Nothing says summer like garden fresh zucchini.  Well, maybe watermelon, but that's another post.  I have had my own zucchini bread recipe for years, but I decided to try this one to see if it would evoke memories from my childhood.  And boy, did it ever.

Like I mentioned, I have a recipe for zucchini bread that I make once or twice per year, but there was something about making this bread that took me back to the summers of my childhood.  I don't know if it was the look, the smell, or maybe a combination of the two that transported me back.  Even as I was making it, it felt like I had done it before, even though this is the first time I have used this particular recipe.  It's hard to describe, but it was pretty neat.

This bread is not as sweet as the recipe I use, but it is very tasty.  Much like any other quick bread, it is soft and satisfying.  I omitted the nuts and raisins because I didn't have any suitable nuts on hand, and in my opinion, raisins are always optional.  Their absence didn't take away from the appeal of the bread with the delicate flavor of the zucchini complimented by the subtle spice of cinnamon.

I don't know if this version of zucchini bread is better than the one I have used in years past, but it has something the other one doesn't, it takes me back in time.  If I ever want to revisit those magical summer days, I know the vehicle to take me there.


Zucchini Bread
Printable Recipe

Ingredients
3 eggs
1 1/2 cups sugar
2 cups peeled, grated zucchini
1/2 cup nuts
1/2 cup raisins
3 teaspoons vanilla
1/4 teaspoon baking soda
3 cups flour
1 teaspoon salt
2 teaspoons cinnamon

Directions
Beat eggs until light and fluffy.  Add oil, sugar, zucchini and vanilla.  Sift flour, salt soda, cinnamon, and baking powder together.  Add to first mixture.  Mix until blended.  Add nuts and raisins.  Pour into two oiled loaf pans. 
Bake at 325 degrees for 1 hour. 

May 10, 2012

Teddy Bear Bread


My cooking skills are a product of food television.  I've been watching cooking shows for as long as I can remember.  Rarely did I use recipe cards or cook books when I tried a new recipe.  I always saw the food being made on the TV before I made it.  That's not to say I never tried a recipe for the first time from a cook book or recipe card, but visual learning was more of the norm for me.

I learned a lot of techniques from watching the television cooks; how to dice an onion, knead dough, folding ingredients into batter, butchering a chicken, etc.  Watching the food applications unfold on the TV made it much simpler to replicate when I tried it on my own.  They gave me a good foundation of skills so I felt comfortable trying new things.

With the food shows growing stale and uninspiring (I miss you Good Eats), my attention has turned more to cook books.  Some of the books I have lay out an application in sometimes two or three pages, thoroughly detailing each step along the way.  This brings me to the old family recipes I have been trying for the first time; many of them handwritten on 3.5 x 5 inch index cards.  No longer do I have the luxury of watching a recipe unfold over thirty minutes, or reading a detailed twelve-step recipe.  My recipes are no longer fool proof.

While I adore these handwritten recipe cards, detail has given way to space, and I am left to fill in the blanks sometimes.  I also think that some of these recipes were pretty much memorized by the author, so something that was thought as a given, may not have made it to the card.  Also, some of these recipes are over fifty years old and some of the terminology and ingredients are foreign to me.  Having never seen or tasted some of these recipes in the past, it can be a challenge.

Good thing I love challenges!   I have been having so much fun with these recipes.  Sometimes I don't get it right, but more often than not, they have been delicious and a joy to make.  For the ones that produce less than ideal results, I know what I did wrong and how to fix it, so that gets me excited to try it again.  Besides, the pride and delight of preparing food from recipes I know were made and written by my family is unmatched by any recipe from a book or cooking show.

I remember Nonna making this teddy bear bread when I was a child.  One summer, it seemed like she was making them all the time.  A cute little brown bear that you can pull apart and eat, now what child wouldn't love that? 

This recipe is very similar to a yeast roll recipe that I have, and it tastes similar.  It is not a sweet bread, and I remember always wanting it to be sweeter as a kid.  I thought that if the bread was in the shape of a bear it should be sweet, more of a dessert bread.  I don't know what my rational was, but I still feel that way, and I still don't know what my rational is.  If I make it again, I may sprinkle it with a little but of sugar, or add some honey to the dough.

Besides sweetness, which is a personal preference, there is one other thing I would change to this bread.  The recipe calls for 2 tablespoons of yeast, or 1 package.  These days, a package of yeast contains about 2 teaspoons.  I didn't know if that had changed over the years, so I used 2 tablespoons, which was too much.  I would recommend 2 teaspoons or 1 tablespoon of yeast at the most.  The bread rose a little too much for my liking and had too much of a yeast flavor.

The kids got a kick of of a loaf of bread in the shape of a bear, though Emilie thought it looked like an elephant.  The bread was fun to make and brought back some wonderful memories, and it's hard to get that from a cooking show.


Teddy Bear Bread
Makes 2 Bears
Printable Recipe
Scald 1/2 cup milk.  Add 3 tablespoons of sugar, 2 teaspoons of salt and 3 tablespoons of butter.  Stir until melted.  Cool.  Dissolve 2 teaspoons yeast (1 package baking yeast) into 1 1/2 cup warm water.  Add to milk mix.  Add enough flour (approx. 4 cups) to make moderately stiff dough.  Knead 8-10 minutes.  Place into greased bowl.  Let rise until doubled.  Punch down.  Divide dough in half.  With one half, divide into 2 pieces (for head and body).  Divide rest into 7 pieces (1 nose, 2 ears, and 4 paws).  Shape into bears.  Let rise until doubled.  Mix 1 egg and 1 tablespoon of water and brush onto bears.  Make indentation in ears.  Place raisins for eyes and belly button.  Bake at 350 degrees for 20-25 minutes.

April 4, 2012

Buttermilk Herb Bread


As I was scanning recipes into my computer, this one was visually the most interesting.  It was folded several times, and seems as if the slightest tug would rip it.  As I was unfolding it some of the inner folds, I found flour that had been trapped in some of the creases.  Needless to say, I had to be very delicate with this piece of paper, and it looks as if it has seen a lot of use.

The bread itself was fairly easy to make, quite reminiscent of pizza dough.  My neighbor gave me access to her herb garden, so I was able to use fresh parley and chives.  I also had an onion on hand, so I chopped some up and added it as well.  The dill seed, though, is what really adds a flavor punch to this bread.

This recipe makes two loaves, and it was the first time I have ever had to braid bread.  I actually have never braided anything, so I enlisted Valerie to teach me.  She braided the first loaf so fast, I didn't have time to see what she did.  On the second loaf, she suddenly forgot how she did the first!  By the time we finally got the second one braided, I was more confused than ever, but at least it was done, and I still don't know how to braid.

The bread is delicious.  Soft and dense, with lots of flavor.  Very good right out of the oven with a little butter.  It also holds up well for a few days after baking, preferably toasted.


Buttermilk Herb Bread
Ingredients
2 packages yeast or 2 1/2 tablespoons powdered
5 - 5 3/4 cups unsifted flour (unbleached)
1/4 cup salad oil
1/2 cup chopped chives or onions
2 tablespoons sugar
2 teaspoons salt
3/4 cup lukewarm water
1 1/4 cup buttermilk (warmed)
1/2 cup chopped parsley or 1/4 cup dried
1 tablespoon dill seed


Instructions
In large mixer bowl dissolve yeast in water, add 2 cups flour, buttermilk, oil, sugar, salt; beat at low speed until moistened. Increase speed to medium, add herbs and mix well. Add 3 1/2 cups flour - knead approximately 5 minutes. Let dough rise in greased bowl for 1 hour.

Grease two long cookie sheets. Punch dough down. Divide in half - then each half into 3 pieces. Roll each piece into a 14 inch long rope - braid 3 pieces into a loaf. Bake in 350 degree oven 35-40 minutes.

Mm mm - Good!