June 27, 2012

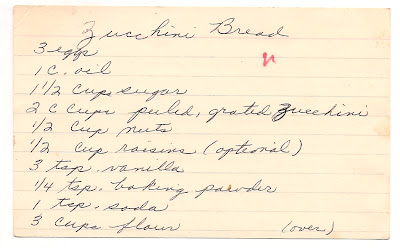
Zucchini Bread


Nothing says summer like garden fresh zucchini.  Well, maybe watermelon, but that's another post.  I have had my own zucchini bread recipe for years, but I decided to try this one to see if it would evoke memories from my childhood.  And boy, did it ever.

Like I mentioned, I have a recipe for zucchini bread that I make once or twice per year, but there was something about making this bread that took me back to the summers of my childhood.  I don't know if it was the look, the smell, or maybe a combination of the two that transported me back.  Even as I was making it, it felt like I had done it before, even though this is the first time I have used this particular recipe.  It's hard to describe, but it was pretty neat.

This bread is not as sweet as the recipe I use, but it is very tasty.  Much like any other quick bread, it is soft and satisfying.  I omitted the nuts and raisins because I didn't have any suitable nuts on hand, and in my opinion, raisins are always optional.  Their absence didn't take away from the appeal of the bread with the delicate flavor of the zucchini complimented by the subtle spice of cinnamon.

I don't know if this version of zucchini bread is better than the one I have used in years past, but it has something the other one doesn't, it takes me back in time.  If I ever want to revisit those magical summer days, I know the vehicle to take me there.


Zucchini Bread
Printable Recipe

Ingredients
3 eggs
1 1/2 cups sugar
2 cups peeled, grated zucchini
1/2 cup nuts
1/2 cup raisins
3 teaspoons vanilla
1/4 teaspoon baking soda
3 cups flour
1 teaspoon salt
2 teaspoons cinnamon

Directions
Beat eggs until light and fluffy.  Add oil, sugar, zucchini and vanilla.  Sift flour, salt soda, cinnamon, and baking powder together.  Add to first mixture.  Mix until blended.  Add nuts and raisins.  Pour into two oiled loaf pans. 
Bake at 325 degrees for 1 hour. 

June 18, 2012

Quick Cherry Crunch


I don't have a lot of recipes that call for cherries, so when I saw this recipe, it moved to the top of my list of things to try.  I am a big fan of cobblers, crunches, crisps, and the like.  Pretty much anything with fruit on the bottom and a sweet topping ranks high on my dessert scale.  This recipe also calls for quick-cooking tapioca, an ingredient I have only before used in Nonna's apple pie, so it is nice to have another application in which to use that ingredient.

Something else that drew me to this recipe is that it looked so simple, and I always like to have deliciously simple dessert recipes at my disposal.  Indeed, it was as simple as it looked and the "quick" in the name was not false advertising.  In no time at all, I had the cherry crunch in the oven and soon the house smelled of sweet oats and cherries.

After taking it out of the oven, I let it cool a bit and then I dug in.  The "crunch" in the name was not false advertising either.  There was a nice sweet crunch on top complimented by the slightly sour soft cherries.  A simple dessert with a lot of flavor.  It could stand to use more cherries, though, in my opinion.  Next time I make it, I may add three cups of cherries.  The way it was, it was kind of like a gooey granola bar, which isn't really a bad thing.  Overall, it is a very tasty dessert.


Quick Cherry Crunch
Printable Recipe

Mix and let stand:
1/2 cup cherry juice
1 1/2 tablespoons quick-cooking tapioca
Melt in large pan:
1/2 cup butter

Mix with it:
1 cup brown sugar
1 cup flour
1 cup oatmeal
1/4 teaspoon baking powder
1/4 teaspoon baking soda
1/4 teaspoon salt
Put half of the mixture in 9 inch square pan. 
Scatter over it:
2 cups sour pitted red cherries and then the tapioca mixture.  Cover with remaining pastry.
Bake 30-35 minutes, until browned.

June 6, 2012

Yum-Yums


There was always a Tupperware container full of yum-yums on the kitchen table during the summer days I spent at Nonna and Grandpa's.  At least that's how I remember it.  The harvest orange container with a white lit constantly beckoned.  I ate my fair share of yum-yums growing up, but this is the first time I have made them myself.

I helped Grandpa make them once or twice, I remember him telling me to get every last bit of peanut butter out of the jar.  He warned that Nonna would bring him the jar from the trash if it failed to meet her standards.  Waste not want not, I suppose.  I made sure to take a rubber spatula to my peanut better jar; Grandpa's point was not lost on me.

There is no baking involved in preparing the yum-yums, but the stove top or microwave needs to be utilized.  I opted to melt everything on the stove, and the process is relatively quick and quite simple.  In no time at all, I was spreading the chocolate butterscotch blend over the rice crispy mixture, and into the refrigerator it went.

The next day the yum-yums were ready to cut, but not before I took the giant 10x15 yum-yum to show the kids and pretend to eat it.  The tip to twist the pan to free the solid mass is definitely one to utilize.  I then cut the brick of chocolaty peanut buttery goodness into 1 inch squares.  Next time, I may let the mixture come to room temperature a bit because the chocolate cracked a little as I was cutting the squares.

These little delights hold true to their name, yum yum!  The soft chocolate layer leading to the peanut butter crunch of the crispy rice bottom is a treat for the senses.  The butterscotch adds a subtle change to the traditional chocolate flavor that is nice, as well.  A perfect little sweet bite.

I also think I know why there were always yum-yums on the table; one batch makes a lot!  Valerie took most of them to a school function, and we were still left with more than enough at home.  Not that I'm complaining, they were eaten and enjoyed by all.  Not a single one made it back from the school, either; I think they were a hit.


Yum-Yum Cookies

To 6 cups Rice Krispies
add the heated mixture of
1 cup brown sugar
1 cup corn syrup, light
1 18 oz. jar peanut butter, smooth
and blend smoothly to coat all of the cereal

Spread as uniformly possible in a 10x15x1 pan.  Mixture is easier to press down with a plastic spatula.

Melt together
1 12 oz. package chocolate chips
1 12 oz. package butterscotch chips
over a low heat, stirring to blend.

Spread this mix over crispy mix in pan.  Cool in refrigerator for several hours or overnight.
Twist pan to free the mix.  Place on cutting board - cut about 1"x1" squares.  Makes about 80 cookies. 
(Store in frig - to keep the chocolate firm)