July 25, 2012

Tart Lemon Squares


I knew this recipe had to be good before I even made it.  I have several recipe cards written in Nonna's handwriting in the same format.  Oven temperature in the upper left, pan size in the upper right, a dotted line separating the ingredient columns.  It was like she was just ready to pass out the cards when she made this decadent dessert because she knew people would be asking for the recipe.  It makes me wonder how many cards she wrote like this.

Angela has been making lemon squares for years, and they are one of my favorite sweet treats, but she does not use this recipe.  At every summer family get-together, I always ask her to make them.  My mom also told me that she used this recipe to make lemon squares for Tupperware parties she hosted (along with toffee squares) and they were always a hit.  I was a bit nervous to make them myself, but I really wanted to try my hand at this recipe.

I don't know if the person who first made lemon squares knew what they were doing, or if was just a happy accident, but it always felt like I was doing something wrong when I was making them.  First of all, the bottom crust is so crumbly before pressing it into the bottom of the pan, it doesn't seem like it should hold together at all.  Then, the lemon mixture is so thin, and pouring it onto an already baked crust, it didn't seem like it would set.  When I took the concoction out of the oven, the mixture had set, but the top was a white color that didn't look normal to me.  Wanting to see it through to the end, I sprinkled the top with confectioner's sugar and waited for it to cool.

Thankfully, my fears were unwarranted.  As I cut the squares and pulled out the first sample, it looked just like a lemon square should.  Even better, it tasted good, too!  The soft, tart, custardy topping with the tender buttery crust is a wonderful combination.  It makes it hard to eat just one, so I didn't.  No wonder Nonna had a supply of handwritten lemon square recipes at her disposal.  If she had brought these to a party I was at, I would be the first in line asking her for the recipe.


Tart Lemon Squares 
Printable Recipe

6 tablespoons (3/4 stick) butter
1/4 cup confectioners' sugar
1 cup plus 3 tablespoons flour
3 eggs
1 cup granulated sugar
Grated rind of 1/2 lemon
1/4 cup fresh lemon juice (from 1 large or 2 small lemons)

Combine butter, confectioners' sugar, and one cup of the flour in food processor.  Process until blended.  Pat dough into even layer on bottom of 9-inch square baking pan.  Bake dough at 350 degrees for 15 minutes or until lightly browned. 

Meanwhile, combine eggs, granulated sugar, lemon rind, lemon juice and remaining three tablespoons of flour in food processor.  Process until well mixed.  Pour lemon mixture over hot crust.
Bake at 350 degrees for 15 to 20 minutes longer - until firm.  Cool on rack.  Sprinkle with confectioners' sugar while warm.  Cut in squares when cool. 

July 18, 2012

Easy Zucchini Pie


Zucchini abounds in the summer here in Indiana.  I just finished a piece of zucchini bread, as a matter of fact.  It seems every time I turn around, someone is offering me a zucchini (or 10) from their garden.  Even as the drought and heat wave push on, it seems the zucchini plants have weathered the blow.

So far on Family Tree-Eats, I have posted recipes for zucchini casserole and zucchini bread, and that is about the extent of my zucchini making prowess.  Though grilled zucchini is quite delicious, brushed with a little olive oil, salt, and pepper.  When I saw this recipe for zucchini pie, I knew I had to try it once my zucchini cup began to runneth over.

I made this recipe even easier because I wanted the pie to be green.  I didn't peel the zucchini, nor did I take out the seeds because they were so small in the zucchini I had.  I also didn't boil the zucchini before blending with the other ingredients.  I pretty much ignored the first couple of lines on the recipe card, which didn't hurt the outcome of the pie one bit.

As far as the rest of assembly, it couldn't be easier.  Just blend, pour and bake.  Making the pie crust was the most difficult part.  I had to bake mine for about 35 minutes once I turned the oven down to 350 degrees, but that may have been because I didn't boil the zucchini before baking.

Besides the novelty of being green, this is one of the best pies I have made in a long time.   I sent some home with Julie and some with Angela and within a few hours I had a couple texts asking me for the recipe.  The pie is light, has a nice soft texture, and it delicately sweet.  It is reminiscent of sugar cream pie, but not nearly as rich.  A perfect summer pie.


Easy Zucchini Pie

1 cup zucchini
1 cup sugar
1 cup Milnot milk
1 egg
1 1/2 tablespoon butter
1/4 teaspoon salt
2 tablespoons flour
1 teaspoon vanilla

Peel zucchini and cut into pieces removing seeds and boil until tender.  Put all above in blender and blend well.  Pour into unbaked pie shell.  Sprinkle top of unbaked pie with cinnamon.  Bake at 400 degrees for 5 minutes, then 350 degrees for about 30 minutes or until knife comes out clean.  Do not over bake.  Allow pie to cool completely before serving.

July 10, 2012

Toffee Squares


While talking to my mom about some of the family recipes I got from Nonna, she asked me about this recipe in particular.  I vaguely remember her making them, and she said she made them all the time for Tupperware parties. 
 
This is an interesting recipe.  There are no leavening agents, and it comes together similarly to a crumb topping.  The recipe also states to brush the top of batter with an egg white before baking, which is something I haven't done with a cookie bar before.  These methods paid off and lend the toffee squares a distinctiveness all their own. 

Fans of crumb topping rejoice!  Not only did the batter look like  crumb topping, the finished product also has a very similar flavor, but in bar form.  The egg white gives the toffee squares a nice sheen, as well.  The bars are soft, subtly sweet, the cinnamon adds a comforting spice, while the nuts lend a nice texture.  A winning combination, in my book!


Toffee Squares
Printable Recipe

1 cup soft butter
1 cup sugar
1 teaspoon vanilla extract
1 egg, separated
2 cups flour
1 teaspoon cinnamon
2/3 cup chopped nuts

Cream butter; add sugar, vanilla, and egg yolk; beat until light. Add sifted dry ingredients and half the nuts; mix well. Press into 15 x 10" pan. Brush top with egg white (slightly beaten), and sprinkle with remaining nuts. Bake at 350 for 15-20 minutes. Cut into squares while warm.

June 27, 2012

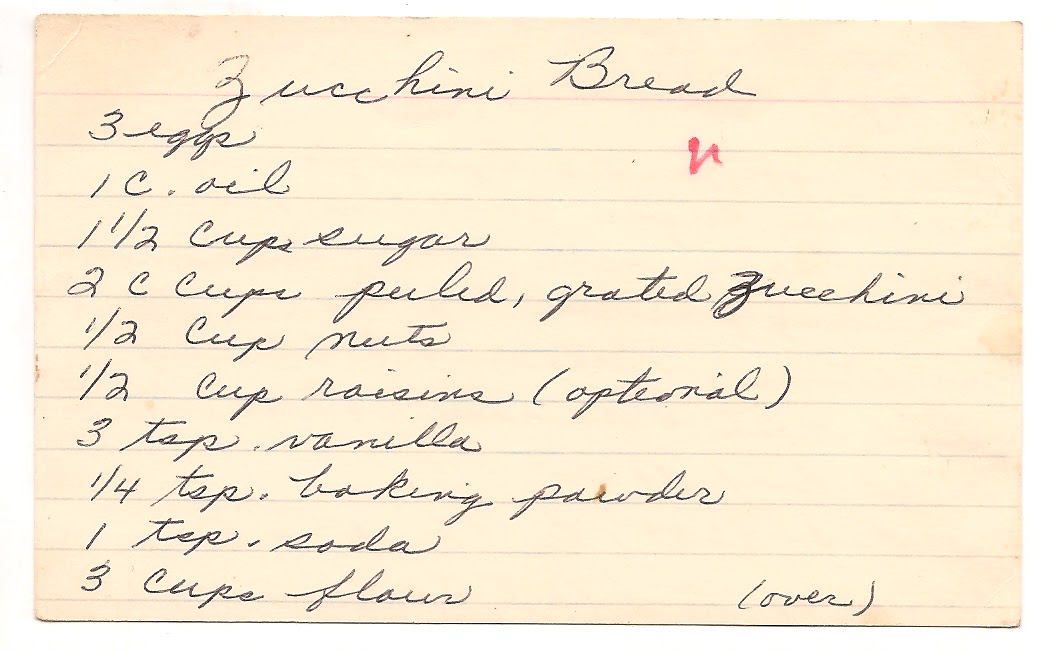
Zucchini Bread


Nothing says summer like garden fresh zucchini.  Well, maybe watermelon, but that's another post.  I have had my own zucchini bread recipe for years, but I decided to try this one to see if it would evoke memories from my childhood.  And boy, did it ever.

Like I mentioned, I have a recipe for zucchini bread that I make once or twice per year, but there was something about making this bread that took me back to the summers of my childhood.  I don't know if it was the look, the smell, or maybe a combination of the two that transported me back.  Even as I was making it, it felt like I had done it before, even though this is the first time I have used this particular recipe.  It's hard to describe, but it was pretty neat.

This bread is not as sweet as the recipe I use, but it is very tasty.  Much like any other quick bread, it is soft and satisfying.  I omitted the nuts and raisins because I didn't have any suitable nuts on hand, and in my opinion, raisins are always optional.  Their absence didn't take away from the appeal of the bread with the delicate flavor of the zucchini complimented by the subtle spice of cinnamon.

I don't know if this version of zucchini bread is better than the one I have used in years past, but it has something the other one doesn't, it takes me back in time.  If I ever want to revisit those magical summer days, I know the vehicle to take me there.


Zucchini Bread
Printable Recipe

Ingredients
3 eggs
1 1/2 cups sugar
2 cups peeled, grated zucchini
1/2 cup nuts
1/2 cup raisins
3 teaspoons vanilla
1/4 teaspoon baking soda
3 cups flour
1 teaspoon salt
2 teaspoons cinnamon

Directions
Beat eggs until light and fluffy.  Add oil, sugar, zucchini and vanilla.  Sift flour, salt soda, cinnamon, and baking powder together.  Add to first mixture.  Mix until blended.  Add nuts and raisins.  Pour into two oiled loaf pans. 
Bake at 325 degrees for 1 hour. 

June 18, 2012

Quick Cherry Crunch


I don't have a lot of recipes that call for cherries, so when I saw this recipe, it moved to the top of my list of things to try.  I am a big fan of cobblers, crunches, crisps, and the like.  Pretty much anything with fruit on the bottom and a sweet topping ranks high on my dessert scale.  This recipe also calls for quick-cooking tapioca, an ingredient I have only before used in Nonna's apple pie, so it is nice to have another application in which to use that ingredient.

Something else that drew me to this recipe is that it looked so simple, and I always like to have deliciously simple dessert recipes at my disposal.  Indeed, it was as simple as it looked and the "quick" in the name was not false advertising.  In no time at all, I had the cherry crunch in the oven and soon the house smelled of sweet oats and cherries.

After taking it out of the oven, I let it cool a bit and then I dug in.  The "crunch" in the name was not false advertising either.  There was a nice sweet crunch on top complimented by the slightly sour soft cherries.  A simple dessert with a lot of flavor.  It could stand to use more cherries, though, in my opinion.  Next time I make it, I may add three cups of cherries.  The way it was, it was kind of like a gooey granola bar, which isn't really a bad thing.  Overall, it is a very tasty dessert.


Quick Cherry Crunch
Printable Recipe

Mix and let stand:
1/2 cup cherry juice
1 1/2 tablespoons quick-cooking tapioca
Melt in large pan:
1/2 cup butter

Mix with it:
1 cup brown sugar
1 cup flour
1 cup oatmeal
1/4 teaspoon baking powder
1/4 teaspoon baking soda
1/4 teaspoon salt
Put half of the mixture in 9 inch square pan. 
Scatter over it:
2 cups sour pitted red cherries and then the tapioca mixture.  Cover with remaining pastry.
Bake 30-35 minutes, until browned.

June 6, 2012

Yum-Yums


There was always a Tupperware container full of yum-yums on the kitchen table during the summer days I spent at Nonna and Grandpa's.  At least that's how I remember it.  The harvest orange container with a white lit constantly beckoned.  I ate my fair share of yum-yums growing up, but this is the first time I have made them myself.

I helped Grandpa make them once or twice, I remember him telling me to get every last bit of peanut butter out of the jar.  He warned that Nonna would bring him the jar from the trash if it failed to meet her standards.  Waste not want not, I suppose.  I made sure to take a rubber spatula to my peanut better jar; Grandpa's point was not lost on me.

There is no baking involved in preparing the yum-yums, but the stove top or microwave needs to be utilized.  I opted to melt everything on the stove, and the process is relatively quick and quite simple.  In no time at all, I was spreading the chocolate butterscotch blend over the rice crispy mixture, and into the refrigerator it went.

The next day the yum-yums were ready to cut, but not before I took the giant 10x15 yum-yum to show the kids and pretend to eat it.  The tip to twist the pan to free the solid mass is definitely one to utilize.  I then cut the brick of chocolaty peanut buttery goodness into 1 inch squares.  Next time, I may let the mixture come to room temperature a bit because the chocolate cracked a little as I was cutting the squares.

These little delights hold true to their name, yum yum!  The soft chocolate layer leading to the peanut butter crunch of the crispy rice bottom is a treat for the senses.  The butterscotch adds a subtle change to the traditional chocolate flavor that is nice, as well.  A perfect little sweet bite.

I also think I know why there were always yum-yums on the table; one batch makes a lot!  Valerie took most of them to a school function, and we were still left with more than enough at home.  Not that I'm complaining, they were eaten and enjoyed by all.  Not a single one made it back from the school, either; I think they were a hit.


Yum-Yum Cookies

To 6 cups Rice Krispies
add the heated mixture of
1 cup brown sugar
1 cup corn syrup, light
1 18 oz. jar peanut butter, smooth
and blend smoothly to coat all of the cereal

Spread as uniformly possible in a 10x15x1 pan.  Mixture is easier to press down with a plastic spatula.

Melt together
1 12 oz. package chocolate chips
1 12 oz. package butterscotch chips
over a low heat, stirring to blend.

Spread this mix over crispy mix in pan.  Cool in refrigerator for several hours or overnight.
Twist pan to free the mix.  Place on cutting board - cut about 1"x1" squares.  Makes about 80 cookies. 
(Store in frig - to keep the chocolate firm)

May 23, 2012

Butter Chicken


This recipe has become a favorite at my house.  I often visited Indian buffets when I worked in Indianapolis and West Lafayette, and my favorite dish was always the butter chicken.  Alas, there are no Indian restaurants where I live now, so I figured I had learn to make it myself.  I found this recipe on allrecipes.com and with the help of a few recommendations in the comments section, this dish is even better than the ones I had at the restaurants.

The changes I made to the original recipe are minor, but definitely add to the success of the dish.  The original recipe calls for cornstarch to thicken the sauce, but I read that it is traditional to use ground cashews as a thickening agent.  I also use a combination of thighs and breasts, instead of just thighs.  The addition of cashews is what puts this recipe over the top.  They elevate the flavor and add a nice consistency and texture to the sauce that the cornstarch can't compete with.

The ingredients list is long, but the butter chicken is not very difficult to make.  It is all about building flavors.  The smells of the warm, rich, comforting spices that permeate the house when I am making this dish is second to none.  There is some heat, flavor-wise, but that can be adjusted by the amount of cayenne you decide to add.  Be your own chef!  If the flavor is good, I can handle a little heat, and believe me the flavor is good in this dish.

Butter Chicken
Printable Recipe

Ingredients
For the sauce:
1 tablespoon peanut oil
1 shallot, finely chopped
1/4 white onion, chopped
2 tablespoons butter
2 teaspoons lemon juice
1 tablespoon ginger-garlic paste, recipe follows
1 teaspoon garam masala
1 teaspoon chili powder
1 teaspoon ground cumin
1 bay leaf
1/4 cup plain yogurt
1 cup half-and-half
1 cup tomato puree
1/4 teaspoon cayenne pepper
1 pinch salt
1 pinch black pepper
1/4 cup finely ground cashews

For the chicken:
1 tablespoon peanut oil
1 pound boneless, skinless chicken thighs, cut into bite-size pieces
1 teaspoon garam masala
1 pinch cayenne pepper

Directions
Heat the oil in a large saucepan over medium high heat. Saute shallot and onion until soft and translucent. Stir in butter, lemon juice, ginger-garlic paste, garam masala, chili powder, cumin and bay leaf. Cook, stirring, for 1 minute. Add tomato sauce, and cook for 2 minutes, stirring frequently. Stir in half-and-half and yogurt. Reduce heat to low, and simmer for 10 minutes, stirring frequently. Season with salt pepper. Remove from heat and set aside.

Heat oil in 12-inch skillet over medium heat. Cook chicken until lightly browned, about 10 minutes. Reduce heat, and season with 1 teaspoon garam masala and cayenne. Stir in a few spoonfuls of sauce, and simmer until liquid has reduced, and chicken is cooked through. Stir cooked chicken and cashews into the sauce. Cook for 5 to 10 minutes, or until thickened.

Ginger-Garlic Paste:
1/2 cup cloves garlic
1/2 cup fresh ginger
1/4 cup canola oil

Combine garlic, ginger, and canola oil in a mini-food processor and process until it forms a semi-smooth paste.  Excess can be stored in the refrigerator for up to a week.

May 17, 2012

Beef or Lamb with Rice


This recipe peaked my interest because it looked so simple.  At the same time it was also something different; familiar ingredients brought together in a new way.  Preparing it was a cinch since we had all the ingredients on hand; I opted for the beef instead of lamb. 

The recipe is very straightforward and the only thing that took much time was waiting for the meat to get tender.  As I was finishing the meal, it started to remind me visually of another family favorite in our house, butter chicken.  Flavor-wise, they are totally different, but I guess it was just because it was a sauced meat served on a bed of rice.

I was very impressed with the flavor of this dish.  The meat was tender and juicy and the tomato sauce gave it a deep rich flavor.  My mouth is watering just thinking about it!  I used my bread to sop up the leftover sauce on my plate so I could savor every last drop.  Sometimes simple is better as this recipe proves, and I am looking forward to trying it with the lamb.


Beef (or Lamb) with Rice
Printable Recipe

Serves 4 to 6
Ingredients
2 lbs. Beef or Lamb (from leg)
1 cup Rice
1 large Onion, sliced
1/4 cup olive oil
1/2 can Tomato Paste
1 cup warm water

Instructions
Have meat cut into small cubes as for stew. Pour oil in hot skillet; heat. Brown meat slightly for about 8 minutes. Add onion; cover; simmer 5 minutes or until onion is soft. Add salt and pepper. Blend tomato paste in cup warm water; add to meat. Cover; simmer about 45 minutes or until tender.

In the meantime, cook rice about 20 minutes in 2 quarts boiling water to which 1/2 teaspoon of salt has been added. Drain in colander; rinse with cup of cold water. Keep hot by placing colander over pot of boiling water.

Arrange rice on hot platter, leaving space in center. Place meat in hollow; pour sauce over meat. Serve very hot.

May 10, 2012

Teddy Bear Bread


My cooking skills are a product of food television.  I've been watching cooking shows for as long as I can remember.  Rarely did I use recipe cards or cook books when I tried a new recipe.  I always saw the food being made on the TV before I made it.  That's not to say I never tried a recipe for the first time from a cook book or recipe card, but visual learning was more of the norm for me.

I learned a lot of techniques from watching the television cooks; how to dice an onion, knead dough, folding ingredients into batter, butchering a chicken, etc.  Watching the food applications unfold on the TV made it much simpler to replicate when I tried it on my own.  They gave me a good foundation of skills so I felt comfortable trying new things.

With the food shows growing stale and uninspiring (I miss you Good Eats), my attention has turned more to cook books.  Some of the books I have lay out an application in sometimes two or three pages, thoroughly detailing each step along the way.  This brings me to the old family recipes I have been trying for the first time; many of them handwritten on 3.5 x 5 inch index cards.  No longer do I have the luxury of watching a recipe unfold over thirty minutes, or reading a detailed twelve-step recipe.  My recipes are no longer fool proof.

While I adore these handwritten recipe cards, detail has given way to space, and I am left to fill in the blanks sometimes.  I also think that some of these recipes were pretty much memorized by the author, so something that was thought as a given, may not have made it to the card.  Also, some of these recipes are over fifty years old and some of the terminology and ingredients are foreign to me.  Having never seen or tasted some of these recipes in the past, it can be a challenge.

Good thing I love challenges!   I have been having so much fun with these recipes.  Sometimes I don't get it right, but more often than not, they have been delicious and a joy to make.  For the ones that produce less than ideal results, I know what I did wrong and how to fix it, so that gets me excited to try it again.  Besides, the pride and delight of preparing food from recipes I know were made and written by my family is unmatched by any recipe from a book or cooking show.

I remember Nonna making this teddy bear bread when I was a child.  One summer, it seemed like she was making them all the time.  A cute little brown bear that you can pull apart and eat, now what child wouldn't love that? 

This recipe is very similar to a yeast roll recipe that I have, and it tastes similar.  It is not a sweet bread, and I remember always wanting it to be sweeter as a kid.  I thought that if the bread was in the shape of a bear it should be sweet, more of a dessert bread.  I don't know what my rational was, but I still feel that way, and I still don't know what my rational is.  If I make it again, I may sprinkle it with a little but of sugar, or add some honey to the dough.

Besides sweetness, which is a personal preference, there is one other thing I would change to this bread.  The recipe calls for 2 tablespoons of yeast, or 1 package.  These days, a package of yeast contains about 2 teaspoons.  I didn't know if that had changed over the years, so I used 2 tablespoons, which was too much.  I would recommend 2 teaspoons or 1 tablespoon of yeast at the most.  The bread rose a little too much for my liking and had too much of a yeast flavor.

The kids got a kick of of a loaf of bread in the shape of a bear, though Emilie thought it looked like an elephant.  The bread was fun to make and brought back some wonderful memories, and it's hard to get that from a cooking show.


Teddy Bear Bread
Makes 2 Bears
Printable Recipe
Scald 1/2 cup milk.  Add 3 tablespoons of sugar, 2 teaspoons of salt and 3 tablespoons of butter.  Stir until melted.  Cool.  Dissolve 2 teaspoons yeast (1 package baking yeast) into 1 1/2 cup warm water.  Add to milk mix.  Add enough flour (approx. 4 cups) to make moderately stiff dough.  Knead 8-10 minutes.  Place into greased bowl.  Let rise until doubled.  Punch down.  Divide dough in half.  With one half, divide into 2 pieces (for head and body).  Divide rest into 7 pieces (1 nose, 2 ears, and 4 paws).  Shape into bears.  Let rise until doubled.  Mix 1 egg and 1 tablespoon of water and brush onto bears.  Make indentation in ears.  Place raisins for eyes and belly button.  Bake at 350 degrees for 20-25 minutes.

May 3, 2012

Banana Cream Pie


I had never made banana cream pie before, and when I saw this recipe, I figured now was the perfect time.  I liked the fact that this recipe called for tofu, as I have had success with tofu based pies in the past. 

This recipe did pose some problems though.  It looks short and sweet, but some important details are lacking.  My initial confusion came from the ingredient listing '1/2 Honey or Maple Syrup'.  I wasn't sure what measurement the '1/2' referred to, so I used 1/2 cup.  Looking back, that may have been a bit much, but it did not negatively affect the overall flavor of the pie.

I also used silken tofu, which is the tofu I used for the other tofu based pies I have made.  The silken tofu resulted in a very loose pie, so I will most likely opt for firm or very firm tofu in the future, so the pie will set up better.  One last thing I would do differently would be to add lemon juice to the pie to prevent the bananas from browning as quickly.  I made the pie in the morning, and by the time we cut into it in the afternoon, the filling almost looked like melted milk chocolate.  Not very visually appealing for bananas.

The overall pie experience wasn't all bad, though.  The pie has a wonderful flavor and is light and refreshing.  A perfect dessert on a warm spring or summer day.  I will take what I learned from this first experience and try again.  The flavor is there, I just need to work on the aesthetics.


Banana Cream Pie
Printable Recipe

Ingredients
1 pound firm tofu
2 or 3 ripe bananas
1/2 cup honey or maple syrup
Vanilla (optional)
1 baked pie crust

Directions
Slice a banana and place on the bottom of the pie crust in a single layer.  Combine the tofu, bananas, honey and vanilla in a blender and mix until smooth.  Pour mixture into pie crust and refrigerate until set.  Add whipped cream, if desired.